Blog Layout

Tips for Choosing the Right Drywall Insulation

July 29, 2024

When it comes to home construction and renovation, insulation plays a critical role in enhancing energy efficiency, comfort, and noise reduction. For homeowners and builders in St. John's, Newfoundland, understanding the different types of drywall insulation and how to choose the right one for your project is essential. At St. John's Drywallers, we aim to provide you with the information you need to make informed decisions about drywall insulation.


Common Types of Drywall Insulation

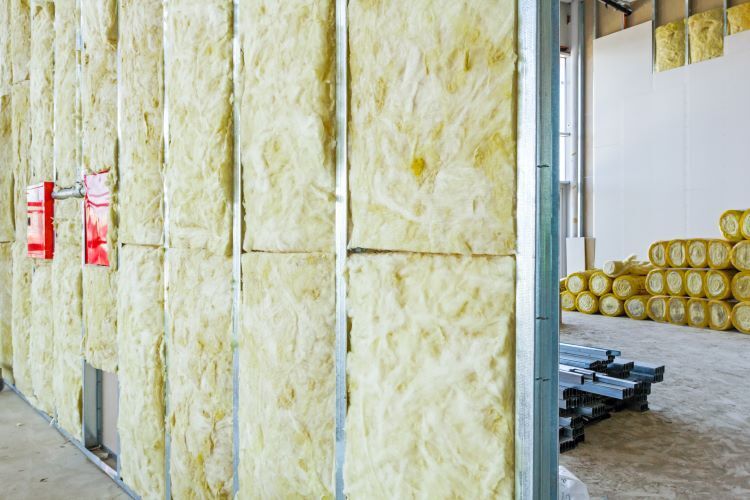
1. Fiberglass Insulation

Overview: Fiberglass insulation is one of the most common and widely used types of insulation. It's made from fine glass fibers and comes in batts or loose-fill forms.

Pros:

  • Affordability: Fiberglass insulation is generally cost-effective and widely available.
  • Ease of Installation: It's relatively easy to install, especially the batt form.
  • Fire Resistance: Fiberglass is non-combustible, adding a layer of fire resistance to your walls.


Cons:

  • Handling: Fiberglass can cause skin irritation and respiratory issues if not handled properly.
  • Settling: Over time, loose-fill fiberglass can settle, reducing its effectiveness.


2. Foam Board Insulation

Overview: Foam board insulation, also known as rigid panel insulation, is made from polystyrene, polyisocyanurate, or polyurethane.

Pros:

  • High R-Value: Foam board offers a high insulation value per inch of thickness.
  • Moisture Resistance: It provides excellent moisture resistance, making it ideal for basements and other damp areas.
  • Durability: Foam board insulation is durable and long-lasting.


Cons:

  • Cost: It can be more expensive than other types of insulation.
  • Installation: Installing foam board requires precision and may be more labor-intensive.


3. Spray Foam Insulation

Overview: Spray foam insulation is a liquid foam that expands and hardens upon application, creating an airtight seal.

Pros:

  • Superior Insulation: Spray foam has a very high R-value and provides excellent air sealing.
  • Versatility: It can be used in hard-to-reach areas and irregular spaces.
  • Moisture and Air Barrier: It effectively prevents air leaks and moisture infiltration.


Cons:

  • Cost: Spray foam is generally more expensive than other insulation types.
  • Professional Installation: It usually requires professional installation due to the equipment and expertise needed.


4. Cellulose Insulation

Overview: Cellulose insulation is made from recycled paper products and treated with fire-retardant chemicals.

Pros:

  • Eco-Friendly: It's one of the most environmentally friendly insulation options.
  • Effective Insulation: Cellulose provides good thermal performance and sound insulation.
  • Settling Resistance: Modern cellulose insulation resists settling better than older versions.


Cons:

  • Moisture Sensitivity: Cellulose can absorb moisture, potentially leading to mold growth if not properly installed.
  • Dust: Installation can produce a lot of dust, requiring protective measures.


Tips for Choosing the Right Drywall Insulation

1. Consider the Climate

St. John's, Newfoundland, experiences a variety of weather conditions, including cold winters and damp, rainy seasons. Choose insulation that provides excellent thermal performance and moisture resistance to ensure comfort and energy efficiency throughout the year.


2. Evaluate Your Budget

While it's important to consider the initial cost of insulation, also think about the long-term savings on energy bills. Higher-quality insulation may have a higher upfront cost but can lead to significant savings over time.


3. Assess the Installation Area

Different areas of your home may require different types of insulation. For example, basements and attics might benefit from moisture-resistant options like spray foam or foam board, while interior walls can use fiberglass or cellulose for soundproofing.


4. Think About Soundproofing

If noise reduction is a priority, consider insulation materials that offer good soundproofing properties. Fiberglass and cellulose are both effective at reducing sound transmission between rooms.


5. Look for Fire Resistance

Safety is paramount, so opt for insulation materials with fire-resistant properties, especially in areas like kitchens and garages. Fiberglass and treated cellulose are good options for enhancing fire safety.


6. Professional Installation vs. DIY

Some insulation types, like fiberglass batts, are suitable for DIY installation, while others, like spray foam, require professional expertise. Assess your comfort level and skills before deciding on a DIY project or hiring professionals.


Conclusion

Choosing the right drywall insulation for your project involves considering various factors, including climate, budget, installation area, soundproofing needs, and fire resistance. By understanding the common types of drywall insulation and following our tips, you can make an informed decision that enhances your home's comfort, energy efficiency, and safety.


At St. John's Drywallers, we are committed to providing high-quality drywall services, including expert advice on insulation options. Contact us today to discuss your insulation needs and let us help you create a comfortable and energy-efficient living space.

You might also like

December 3, 2024
Drywall installation is a crucial step in any renovation or construction project. However, achieving a professional-looking result starts long before the drywall sheets are put in place. Proper wall preparation ensures a smooth and efficient installation process while enhancing the durability and appearance of your walls. At St. John's Drywallers , we emphasize the importance of preparation as the foundation of quality workmanship. Here’s how to get your walls ready for drywall installation in your St. John’s, Newfoundland home or business. Step 1: Clear the Space Start by removing any obstacles from the area. This includes furniture, décor, and other items that could get in the way of the installation process. Protect your floors and any immovable fixtures with drop cloths or plastic sheeting. Why It Matters: A clutter-free workspace allows for safer and faster installation while protecting your property from dust and debris. Step 2: Inspect the Walls Examine your existing walls or studs for any signs of damage, mold, or structural issues. If you’re working with an open wall frame, ensure the studs are intact and securely in place. What to Address: Cracks or Holes: Patch up imperfections to prevent issues later. Mold or Moisture: Resolve water damage and dry the area thoroughly to avoid long-term problems. Step 3: Check Insulation and Vapor Barriers For homes in St. John’s, where weather can be harsh and unpredictable, proper insulation is critical. If the wall requires insulation, install it before proceeding. In moisture-prone areas like basements, adding a vapor barrier is highly recommended. Pro Tip: Use moisture-resistant or fire-rated insulation materials where applicable to meet building codes and improve safety. Step 4: Confirm Proper Framing Ensure the wall studs are spaced correctly, typically 16 to 24 inches apart. Check that they are level and plumb, as uneven studs can lead to misaligned drywall. Tools Needed: Level: To ensure the studs are straight. Measuring Tape: To verify spacing accuracy. Step 5: Mark Electrical and Plumbing Fixtures If the wall includes electrical wiring, outlets, switches, or plumbing, these should be installed before the drywall goes up. Mark their locations clearly on the studs to avoid covering them during installation. Key Considerations: Ensure electrical boxes are installed flush with the planned drywall surface. Anchor plumbing securely to prevent shifting over time. Step 6: Clean and Smooth Surfaces Remove any debris, dust, or obstructions from the studs and surrounding area. If you’re covering an existing wall, ensure it is clean, dry, and free of loose paint or wallpaper. Optional Step: Apply primer or sealant to any exposed wood or existing wall materials to enhance adhesion and protect against moisture. Step 7: Gather Necessary Tools and Materials Preparation also involves ensuring you have everything you need for a seamless installation. Drywall Essentials Checklist: Drywall sheets (cut to size if needed) Screws or nails Drywall tape and joint compound Measuring tape, utility knife, and drywall saw Screw gun or drill Why Proper Preparation Is Key Taking the time to prepare your walls before drywall installation can save you from costly mistakes, time-consuming repairs, and long-term durability issues. At St. John's Drywallers , we pride ourselves on meticulous preparation that guarantees superior results for our clients in Newfoundland. Trust the Experts at St. John's Drywallers Proper wall preparation is just one part of the equation. With St. John’s Drywallers , you’ll get expert assistance at every step of the drywall process, from preparation to finishing. Why Choose Us? Local Expertise: We understand the unique building challenges in St. John’s. Experienced Team: Our professionals have years of experience in drywall installation. Quality Materials: We use only the best drywall and finishing products. Customer-Centric Service: We’re committed to ensuring your satisfaction with every project. Conclusion Preparing your walls for drywall installation is an essential step to achieving a flawless finish. By following these steps, you’ll create a solid foundation for your project and ensure that your drywall looks great and lasts for years. For professional drywall services in St. John’s, Newfoundland, contact St. John’s Drywallers today. Let us handle your project with precision and care!
November 27, 2024
When it comes to constructing or renovating interiors, the choice of drywall can significantly impact the aesthetics, durability, and functionality of your space. Solid gypsum sheets are becoming the top choice for homeowners and builders alike in St. John's, Newfoundland, thanks to their unparalleled benefits. At St. John's Drywallers , we believe in providing our clients with the best materials, and solid gypsum sheets are a superior option worth considering. What Are Solid Gypsum Sheets? Solid gypsum sheets are made from a core of gypsum—a naturally occurring mineral—encased in paper or fiberglass. This material is known for its strength, versatility, and excellent fire-resistant properties. Gypsum drywall is available in various types and thicknesses, making it suitable for a wide range of applications, from residential to commercial projects. Benefits of Solid Gypsum Sheets 1. Superior Strength and Durability Solid gypsum sheets are engineered for longevity. Their dense core provides excellent resistance to cracks, dents, and impact, making them ideal for high-traffic areas. Applications: Living rooms and hallways. Schools, hospitals, and office spaces. 2. Excellent Fire Resistance Gypsum is naturally fire-resistant, offering an added layer of safety to your home or business. Features: Fire-rated gypsum sheets slow the spread of flames, buying crucial time during emergencies. These sheets meet strict fire code requirements, making them a preferred choice for safety-conscious builders. 3. Moisture and Mold Resistance St. John’s climate can bring challenges like high humidity and condensation. Solid gypsum sheets designed for moisture resistance are perfect for combating these conditions. Benefits: Prevents mold and mildew growth, ensuring better air quality indoors. Ideal for kitchens, bathrooms, and basements. 4. Soundproofing Qualities Gypsum drywall effectively reduces noise transmission, providing a quieter, more peaceful environment. Ideal for: Home offices or study rooms. Shared walls in apartment buildings or duplexes. 5. Easy Installation and Maintenance Solid gypsum sheets are lightweight yet sturdy, making them easier to handle during installation. They are also simple to repair and finish. Features: Can be cut to size with standard tools. Compatible with a variety of paints and finishes, allowing customization. Choosing the Right Type of Gypsum Drywall Not all gypsum sheets are created equal. Depending on your specific needs, you can choose from: Regular Gypsum Boards: Standard drywall for general use. Moisture-Resistant Boards: Designed for damp areas. Fire-Resistant Boards: Ideal for safety-critical applications. Soundproof Boards: Specialized for noise reduction. Tip: Work with a professional drywall contractor to determine the best option for your space. Why St. John’s Drywallers Trust Solid Gypsum Sheets At St. John’s Drywallers, we prioritize quality and performance in every project. Solid gypsum sheets offer: Versatility: Suitable for walls, ceilings, and even curved surfaces. Reliability: Trusted by builders and contractors for consistent results. Cost-Effectiveness: A long-lasting investment for your property. Conclusion Whether you're remodeling a cozy home or working on a large-scale commercial project, solid gypsum sheets are an excellent choice for superior drywall solutions. Their strength, fire resistance, and versatility make them a standout material for creating beautiful and functional spaces. Ready to upgrade your walls? Contact St. John's Drywallers today for expert advice and professional installation services. Let us help you achieve flawless interiors with the best materials on the market!
November 18, 2024
Drywall finishing is a crucial part of any renovation or construction project, providing a smooth, polished look to your interiors. Whether you're building a new home or remodeling an existing space, achieving a flawless drywall finish can significantly enhance the aesthetics and value of your property. At St. John's Drywallers , we specialize in delivering top-quality drywall services to homeowners and businesses in St. John's, Newfoundland. In this guide, we'll walk you through the entire process of drywall finishing , explaining each step in detail to help you achieve professional results. Why Drywall Finishing Matters Before diving into the process, let's explore why drywall finishing is so important: Aesthetic Appeal: Proper finishing results in smooth, even walls that are ready for painting or wallpapering, giving your space a polished, professional look. Durability: High-quality finishing strengthens the drywall, making it more resistant to wear and tear over time. Increased Property Value: Well-finished walls can enhance the value of your home, especially if you're planning to sell in the future. Understanding the 5 Levels of Drywall Finishing Drywall finishing is categorized into five levels, each representing a different degree of smoothness and preparation for painting or texturing: Level 0: No finishing is done; drywall is simply hung. Ideal for temporary spaces. Level 1: Joints are covered with a single coat of compound and tape. Suitable for areas hidden from view, like attics and utility rooms. Level 2: A second coat of compound is applied over the tape. Commonly used in garages and storage areas. Level 3: Three coats of compound are applied, perfect for walls that will receive a heavy texture or low-sheen paint. Level 4: Three coats of compound are applied, sanded, and ready for flat or satin paint finishes. This is the standard for most residential interiors. Level 5: The highest level, with a skim coat applied over the entire surface. Ideal for areas with high-gloss paint or critical lighting. For most home projects, Level 4 is the standard, while Level 5 is recommended for areas where a flawless finish is required. Step-by-Step Guide to the Drywall Finishing Process Step 1: Preparation Before you begin, it's essential to prepare the drywall surface. This includes checking for any protruding screws, loose drywall sheets, or damaged edges. Make sure the surface is clean and free of dust. Tools Needed: Utility knife, screwdriver, sanding block. Tip: Use a shop vac to clean up dust and debris from the drywall for better compound adhesion. Step 2: Taping the Joints The first step in finishing drywall is applying tape to the joints between the drywall sheets. This reinforces the seams and prevents cracks from forming. Paper Tape vs. Mesh Tape: Paper Tape: Stronger and more resistant to cracks. Ideal for long-term durability. Mesh Tape: Easier to work with but may require more compound for a smooth finish. Using a 6-inch drywall knife, apply a thin layer of joint compound along the seams. Then, embed the tape into the wet compound, pressing it firmly to ensure a strong bond. Step 3: Applying the First Coat of Joint Compound (Mudding) With the tape in place, it's time to apply the first coat of joint compound, also known as "mud." This coat covers the taped seams and screw holes. Application: Use a 10- to 12-inch drywall knife to spread the compound evenly over the seams. Feather the edges to create a smooth transition between the drywall and the compound. Drying Time: Allow 24 hours for the compound to dry completely before proceeding to the next coat. Step 4: Second Coat of Joint Compound After the first coat has dried, lightly sand the surface with a fine-grit sandpaper to remove any bumps or ridges. Wipe away any dust before applying the second coat. Goal: Extend the second coat a few inches beyond the first coat to further blend the seam into the drywall. Tip: Apply the compound in thin layers to avoid cracking and reduce drying time. Step 5: Third Coat of Joint Compound The third and final coat is used to perfect the surface, filling in any remaining imperfections. This coat should be thinner than the previous ones, focusing on creating a smooth, seamless finish. Application: Use a 12-inch drywall knife to feather the edges as much as possible, ensuring there are no visible lines. Drying Time: Let it dry for at least 24 hours before the final sanding. Step 6: Sanding for a Smooth Finish Once the final coat is dry, it's time to sand the entire surface to achieve a perfectly smooth finish. Use a sanding pole with fine-grit sandpaper for best results. Tip: Use a bright light held at an angle to the wall to highlight any remaining imperfections. Safety: Wear a dust mask and safety goggles to protect yourself from drywall dust. Step 7: Priming the Walls The last step in the drywall finishing process is applying a coat of primer. This seals the drywall and provides a uniform surface for painting. Tools Needed: Roller, paintbrush, drywall primer. Tip: Use a high-quality primer to prevent flashing (uneven sheen) when painting. Common Mistakes to Avoid in Drywall Finishing Skipping the Sanding: Sanding between coats is crucial for a smooth finish. Applying Too Much Compound: This can lead to cracking and longer drying times. Not Using Primer: Skipping the primer can result in uneven paint coverage and poor adhesion. Why Choose St. John's Drywallers for Your Drywall Finishing Needs? At St. John's Drywallers, we take pride in delivering exceptional drywall finishing services tailored to your specific needs. Here's why homeowners and businesses in St. John's, Newfoundland, trust us: Experienced Professionals: Our skilled team has years of experience in drywall finishing, ensuring flawless results. Quality Materials: We use only the best compounds, tapes, and primers for long-lasting durability. Customer Satisfaction: We are committed to providing high-quality services that exceed your expectations. Final Thoughts Drywall finishing is an art that requires patience, skill, and attention to detail. By following the right process and using the correct tools, you can achieve a smooth, professional finish that enhances the beauty of your interiors. Whether you're tackling a DIY project or need expert assistance, St. John's Drywallers is here to help with all your drywall needs. Ready to transform your space? Contact St. John's Drywallers today for a free consultation and estimate on your next drywall finishing project!
More Posts

Book a Service Today

Share by: